
Adding and Modifying Tasks
Tasks![]() A unit of work, such as a follow-up, review or request for information, which can be tied to a specific file. can be added from three places within RL6:
A unit of work, such as a follow-up, review or request for information, which can be tied to a specific file. can be added from three places within RL6:
- Task Management page
-
- Patient
Note: Safety Huddle task types can only be created in Safety Huddle forms.
Tasks that are created from within a
Note: Administrators may configure the default RL6 notification email settings. These defaults can be overridden for each individual task.
To add or modify tasks:
- Access the Add/Modify Task
- From the Task Management page, click:
- Add Task to add a new task. The Add Task
- Open Task after you have checked the box next to the task you would like to modify. Alternatively, click on the Task ID number to open the task. The Modify Task
- Add Task to add a new task. The Add Task
- From a
- If the
*_COMMON_TASKS– one exists for each module), click Add at the top of the grid.
Prerequisites: You must have the 'Edit Assigned Tasks' or 'Edit Created Tasks' functions enable for your role. To task that were not assigned to you or created by you, you must have the 'Edit Other Users' Tasks' role function enabled.
- From the Task Management page, click:
- Fill in or modify all the necessary fields. See Task Fields for detailed descriptions of each field.
- (Optional) If the task is associated with a file, click Open File to view the file content. Click View Summary to view the File Summary that your role allows.
- Note: Open File button is only available if the Task
- Prerequisites: You must have the 'Task Summary' function enabled for your role.
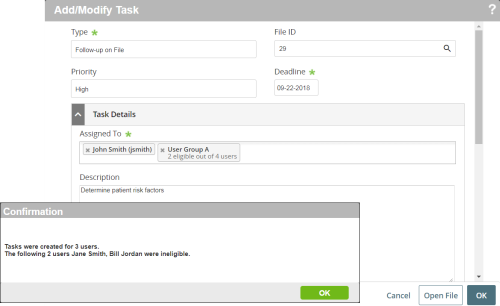
- Click OK. If the task is assigned to multiple users in a user group, a confirmation message displays the number of users for which the task is created and if there are any unsuccessful assignment attempts for users that are ineligible (i.e., because their status is inactive or they do not have a
|
Field |
Required |
Description |
|---|---|---|
|
Type |
Y |
A list of task types, as defined by your administrator. |
|
File ID |
N |
The ID of the file to which the task will be associated. This field supports a full-text index search. To find the file ID, enter any amount of the first characters in any combination of details such as the event type, person affected name, etc. A refined list of qualifying results will display in the drop-down. Note: Only New and In-Progress files will be among the search results. |
|
Priority |
N |
The importance of the task: |
|
Deadline |
Y |
The date by which the task should be completed. Click on the Deadline field to choose a date from the calendar pop-up. The date cannot be in the past. Note: deadlines will be sent based on the time zone of the user who created them. |
|
Assigned To |
Y |
The user(s) or user groups(s) assigned to complete the task. By default, the person who has created the task is displayed as the owner and task assignee. However, you can begin typing to search for (by first name, middle name, last name, specialty, department, title, employee type, email, and/or user group description) and assign to another user, additional users or a user group to complete the task. Click on the field to show the five most recent people ( Note: If you select a user group, the system will attempt to assign tasks to each user group member. "X eligible out of Y users" will be displayed in the confirmation to indicate the number of users in the user group for whom the new task has been successfully assigned. Tasks will only be assigned to the eligible users in the user group. Ineligible users are inactive or those users without sufficient |
|
Description |
N |
The instructions for the task. |
|
Include Attachments from the File |
N |
This displays a list of all the file attachments (saved) in the current file. Select any of the attachments to include them in the task assignment email notifications and to make them available for users to download via this Note: To maintain security, attachments stored in follow-ups cannot be included in tasks. |
|
Assignee Response Required |
N |
Check this box if you want the system to verify that a response has been provided when the assignee attempts to complete a task (i.e. by entering 100 in the % Completed field, by clicking the Complete Task button for the task in the Task Management page, or by marking the task complete in the open file). The system will prompt the assignee to populate the Assignee Response field. Unchecked, the assignee can mark the task complete without filling out the Assignee Response fields. Note: The default setting for this check box is controlled by the TASK_FIELD_DEFAULT_RESPONSEREQUIRED general system parameter of each module. |
|
New Task Creation email |
N |
A check box that determines if email notifications will be sent upon creation of the task. The email contains a link to open the task in the Task Management page. When selected, the |
|
Reminder email |
N |
A check box that determines if email notifications will be sent prior to the task’s deadline date. When selected, the date field is active. Click the field to choose a date from the calendar pop-up on which the reminder email should be sent. The date cannot be later than the deadline date. Note: reminder emails will be sent based on the time zone of the user who created them. |
|
Send Email(s) to |
N |
This field is active when |
|
Task Completion email to (Creator Name) |
N |
When this option is checked, an email notification will be sent to the creator when the task has been marked complete. Note: Tasks can be marked complete a number of ways: by entering 100 in the % Complete field of the Task Note: You can send an email to the task creator by clicking the name link. Upon clicking the link, a .eml file automatically downloads. The .eml file opens a new draft message in your default email client. The new message includes both links to the task detail and the associated file pre-populated in the message body. |
|
% Completed |
N |
A numeric field that accepts whole numbers between |
|
Task Completed Date |
N |
The date the task was completed on. This field can be populated manually by the user. It is also automatically set to the current day's date at the time when the task is set to 100% in the |
|
Assignee Response |
N |
A field where the assignee can comment on the task and/or describe its completion. |